DIY Installation Sequence
Follow the guide below for a quick installation overview of Thermalboard. For more detailed instructions you can download our free Installation Manual here.
Materials Required
- PEX piping and fittings
- threaded male adaptor
- construction adhesive
- screws
- crimp rings
- drywall screws
- 1″ drywall screws
Tools Needed
- drill
- crimping tool
- screw gun
- circular saw
- rubber mallet
- chalk line
- PEX crimper
- PEX cutter

Step 1
Cut the Panels
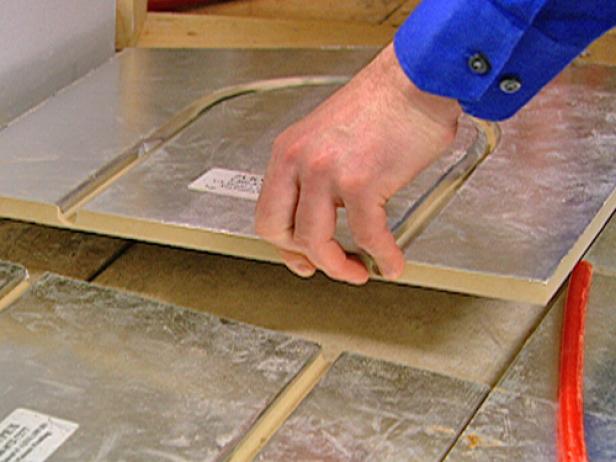
Cut all of the panels to size, and lay them out as you want them before gluing any of the panels down.
Step 2
Cut the PEX Pipe and Secure
Cut several 12 inch pieces of the PEX pipe, and lay out the panels. Start at the longest wall.
Insert a piece of the PEX into the track to ensure that the panels are aligned. Use a rubber mallet to help secure the PEX into the track.

Step 3
Cut the Panels and Fit into Place
Continue fitting the panels and securing them with the PEX. Mark the panels that need to be cut, and use a circular saw to make the cuts.
When making a filler piece, make them as big as possible. Continue around the room, fitting the panels into place.
Note: Use tile setters between each panel to create a 1/8 inch gap to allow for expansion.

Step 4
Glue the Panels
Glue each panel down starting in the corner of the room. Apply the adhesive to the back of each panel in the center and along all four edges. Be sure to apply an even bead of adhesive on the tiles.

Step 5
Place Tile Spacers Between Panels
Place the panel into position, and place a tile spacer in between the panels. Screw the panel into place.
Remove the next panel, and apply the adhesive. Insert the spacers and reinsert the short piece of PEX into the track to further ensure alignment.

Step 6
Screw Down the Tile
When the tile is positioned, screw it down. Use at least 10 screws on a full panel.
Step 7
Run the Thermostat
The thermostat that powers radiant heat flooring has a sensor that measures the temperature of the floor. The placement of this sensor is crucial for optimal performance. The best place for the sensor is midway in the radiant loop in the thinnest space between the panels and tile.
Step 8
Run PEX Piping Through the Wall
Leave the feed and return panels for the PEX loose. Drill two holes through the wall to get to the water heater. Mark them down, and keep the hole in line with the track. Remove the panel so the drill won’t cause any damage.
Step 9
Mount the Panels and Remove the
Short Pieces
Permanently mount the last two panels.
Step 11
Feed the Pipe Through the Wall
Mark the end of the pipe in the direction the water will flow, and feed that end through the wall. Be sure to push plenty of extra pipe through the wall.

Step 12
Lay PEX Pipe Into the Track
Unroll the PEX, and walk it into the track as you go. Take the turns and bends slowly to prevent damage to the pipe. Slowly continue the process until all of the tracks are filled.
Step 13
Cut the PEX Pipe
Leaving extra pipe, cut the PEX so you can feed it back through the wall. Use a mallet to ensure the PEX hasn’t popped out of the track.
Tip: Run air or water through the system to check for leaks before installing the finished floor.
Step 14
Connect Radiant Block to the Supply
The radiant mixing block ties into the water heater. The feed and return from the radiant block will go into two ports and is connected to the supply, which comes from the water heater.

Step 15
Attach Adaptor to Heat Loop Port
Remove the control panel and the cover. Use a threaded male adaptor coated with Teflon paste, and screw into the radiant heat loop port on the pump.
Step 16
Connect PEX and Threaded Adaptors
Add Teflon paste to the threaded 3/8-inch PEX adaptor, and connect to the threaded male adaptor.
Step 17
Tighten Connection and Mount Valve
Use a pair of slip joint pliers to tighten down the connection. Repeat the process on the other radiant loop port.
Mark and mount the valve using 1/4″ x 2″ hex screws.
Step 18
Cut the Pipe
Check the PEX line for the marks made earlier indicating the flow direction. Cut the pipe to length.

Step 19
Attach the PEX Line to the Port
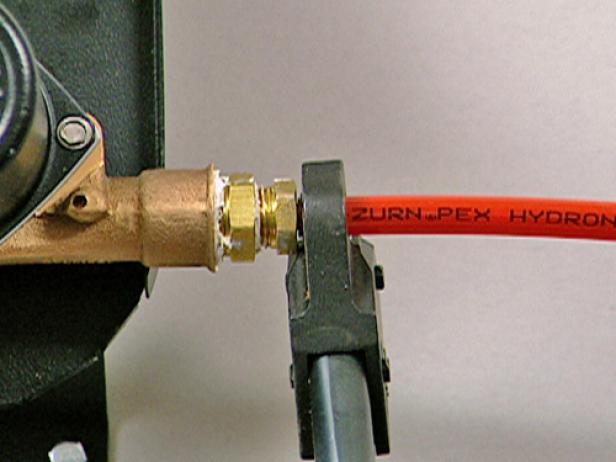
Place a crimp ring in place, and attach the PEX line to the appropriate port on the valve. Use a crimping tool to secure the connection in place.
Step 20
Run Thermostat and Control Panel
Connect the other side of the radiant loop, and run the thermostat line into the valve and replace the cover.
Hook up the control panel by finishing up the wiring. Note: Always check with the manufacturer’s instructions before wiring for specific instructions.

Step 21
Connect Radiant Loop to the Block
Mount the radiant block, and connect the radiant loop to the block.
Step 22
Connect Controller to Thermostat
Connect the controller to the water heater thermostat.
Article & photos featured on DIY Network.

Get Your Free Project Estimate
Delivered Factory Direct to your Jobsite
